Adding Pinterest to Your Hubspot Blog's Social Sharing Bar
We started using Hubspot at my work a few months ago for marketing campaigns, landing pages, and as a blogging platform. It’s pretty intuitive, and I’ve been able to dig into the guts as we require changes to the layout. One example: Hubspot’s current social sharing module for the blog doesn’t include Pinterest.
Originally, our blog post template was set up to include this HubL (Hubspot’s templating language) tag just below the title:
{% blog_social_sharing "blog_social_sharing" overrideable=False, label='Blog Social Sharing' %}
Hubspot’s blog_social_sharing module spits out a row of social media icons with counters, just like this:

Looks just fine. But we wanted to add Pinterest. Hubspot doesn’t allow you to make changes to the global modules, but you replace the module with your own code.
The example output HubL offers for the blog_social_sharing module is pretty straightforward:
1
2
3
4
5
6
7
8
9
10
11
12
13
14
15
16
17
18
19
20
21
22
23
24
25
26
27
28
29
30
31
32
33
34
35
36
37
38
39
40
41
42
43
44
<span id="hs_cos_wrapper_blog_social_sharing"
class="hs_cos_wrapper hs_cos_wrapper_widget
hs_cos_wrapper_type_blog_social_sharing"
style="" data-hs-cos-general-type="widget"
data-hs-cos-type="blog_social_sharing">
     <div class="hs-blog-social-share">
          <ul class="hs-blog-social-share-list">

               <li class="hs-blog-social-share-item
               hs-blog-social-share-item-twitter">
                     <a href="https://twitter.com/share"
                     class="twitter-share-button"
                     data-lang="en"
                     data-url="http://designers.hubspot.com/blog"
                     data-size="medium"
                     data-text="">Tweet</a>
               </li>

               <li class="hs-blog-social-share-item
               hs-blog-social-share-item-linkedin">
                    <script type="IN/Share"
                    data-url="http://designers.hubspot.com/blog"
                    data-showzero="true"
                    data-counter="right"></script>
                </li>

                <li class="hs-blog-social-share-item
                hs-blog-social-share-item-facebook">
                     <div class="fb-like"
                     data-href="http://designers.hubspot.com/blog"
                     data-layout="button_count" data-action="like"
                     data-show-faces="false" data-share="true"
                     data-width="120"></div>
                </li>

                <li class="hs-blog-social-share-item
                hs-blog-social-share-item-google-plus">
                      <div class="g-plusone" data-size="medium"
                      data-href="http://designers.hubspot.com/blog"></div>
                </li>

          </ul>
      </div>
</span>
With this as a starting point, it should be pretty easy to add a pinterest button in line with the others. But first things first, don’t forget to replace the example URL with the correct HubL expression. Meaning, every URL in the code above should be replaced by a HubL expression:
{{ content.absolute_url }}.
I’ve never used Pinterest much, so I visited their developer page to learn how to generate a “Pin it” button. The URL for a “Pin it” button takes parameters, and the three we’re concerned with are:
- url - the absolute url of the blog post. HubL expression:
{{ content.absolute_url }} - description - the post title. HubL expression:
{{ page_meta.name }} - media - the post’s featured image:
{{ content.featured_image }}
To add a Pinterest button, I followed the format of the others built it as a list item. Check out the parameters of the link URL to see how the HubL expressions are used:
1
2
3
4
5
6
7
8
9
10
11
12
13
14
15
16
17
18
19
20
21
22
23
24
25
26
<!-- Same class as the other list items + custom -->

<li class="hs-blog-social-share-item
hs-blog-social-share-item-pinterest">

     <div class="pin-it"
     style="display:inline-block">

          <!-- URL with HubL parameters -->

          <a data-pin-do="buttonPin"
          data-pin-count="beside"
          href="//www.pinterest.com/pin/create/button/
          ?url={{ content.absolute_url }}
          &description={{ page_meta.name }}
          &media={{ content.featured_image }}">

          <!-- "Pin it" button image -->

          <img style="vertical-align:middle"
          src="//assets.pinterest.com/images/pidgets/
          pinit_fg_en_rect_gray_20.png" />
          </a>

     </div>
</li>
That’s all the code for the “Pin it” button. Now just insert the list item wherever you want it to show up in the order of social buttons. I placed it before Google Plus for no particular reason:
1
2
3
4
5
6
7
8
9
10
11
12
13
14
15
16
17
18
19
20
21
22
23
24
25
26
27
28
29
30
31
32
33
34
35
36
37
38
39
40
41
42
43
44
45
46
47
48
49
50
51
52
53
54
55
56
57
58
59
60
61
62
<span id="hs_cos_wrapper_blog_social_sharing"
class="hs_cos_wrapper hs_cos_wrapper_widget
hs_cos_wrapper_type_blog_social_sharing"
style="" data-hs-cos-general-type="widget"
data-hs-cos-type="blog_social_sharing">
     <div class="hs-blog-social-share">
          <ul class="hs-blog-social-share-list">

               <li class="hs-blog-social-share-item
               hs-blog-social-share-item-twitter">
                     <a href="https://twitter.com/share"
                     class="twitter-share-button"
                     data-lang="en"
                     data-url="{{ content.absolute_url }}"
                     data-size="medium"
                     data-text="">Tweet</a>
               </li>

               <li class="hs-blog-social-share-item
               hs-blog-social-share-item-linkedin">
                    <script type="IN/Share"
                    data-url="{{ content.absolute_url }}"
                    data-showzero="true"
                    data-counter="right"></script>
                </li>

                <li class="hs-blog-social-share-item
                hs-blog-social-share-item-facebook">
                     <div class="fb-like"
                     data-href="{{ content.absolute_url }}"
                     data-layout="button_count" data-action="like"
                     data-show-faces="false" data-share="true"
                     data-width="120"></div>
                </li>

                <li class="hs-blog-social-share-item
                hs-blog-social-share-item-pinterest">
                     <div class="pin-it"
                     style="display:inline-block">
                          <a data-pin-do="buttonPin"
                          data-pin-count="beside"
                          href="//www.pinterest.com/pin/create/button/
                          ?url={{ content.absolute_url }}
                          &description={{ page_meta.name }}
                          &media={{ content.featured_image }}">

                          <img style="vertical-align:middle"
                          src="//assets.pinterest.com/images/pidgets/
                          pinit_fg_en_rect_gray_20.png" />
                          </a>
                     </div>
                </li>

                <li class="hs-blog-social-share-item
                hs-blog-social-share-item-google-plus">
                      <div class="g-plusone" data-size="medium"
                      data-href="{{ content.absolute_url }}"></div>
                </li>

          </ul>
      </div>
</span>
Now just insert this HTML directly into your Hubspot blog post template.
Almost done, but the last step is crucial!
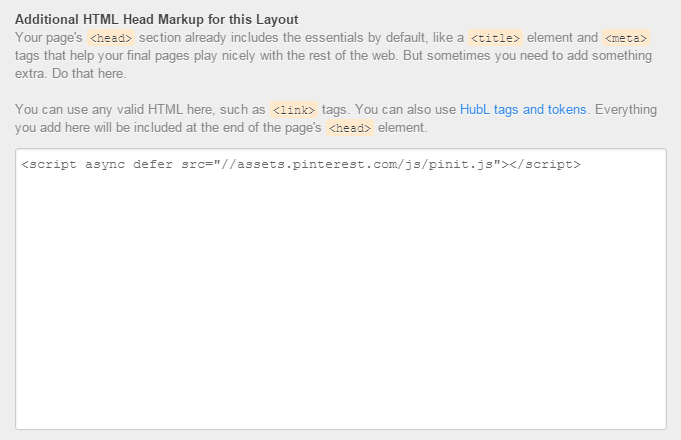
The “Pin it” button requires a little bit of Javascript to work correctly: <script async defer src="//assets.pinterest.com/js/pinit.js"></script>. You can add this to the <head> of your blog post template, just click Edit in the design manager, then Edit Head. You’ll see an input box toward the bottom of the modal where you can insert the code, like this:
Once you do that, your new row of social sharing buttons should look just like this:

Give me a shout if you found this helpful, or have any trouble getting it to work. Let me know if you find any better ways to implement it too.