WrapAPI Beginner's Tutorial: Build an Image Comics Release Tracker
With the right API, you can build an app to solve almost any problem. But what if there’s no API available? WrapAPI allows you to make your own, and in this tutorial I’ll walk you through the first project I built with it.
Required skills: Intermediate HTML and JS
A few months ago, I had to make a difficult decision: buy more long boxes, or stop buying single issue comics. If you’re a comics fan, you know the struggle. For me, especially considering I’ll be moving out of state in a few week, it made a lot more sense to cut the cord and stop buying single issues (apologies to all my favorite writers).
Now, I pretty much only read titles from Image. I’m still a fan, so I want to keep up on my favorite series by picking up the trade paperbacks when they come out. But I follow too many authors to make that a simple task. The problem: I want the quickest way to see at a glance which trades are coming out on any given week. The solution? Well, I couldn’t find a simple, clean one I really liked. I tried following releases on Amazon or TFAW, or watching release dates on Image’s site, but all the methods I tried took too many clicks and didn’t put the information I wanted right in front of me.
Enter WrapAPI, the all-in-one API builder
With WrapAPI, you can define forms or data on a website and capture those elements. Image Comics’ website, for example, has a section featuring upcoming comics at URLs like this: http://www.imagecomics.com/comics/upcoming-releases/2016/6. This page features all the comics releasing in June, 2016. WrapAPI can use the structure of this URL to gather data for any selected month Image currently has a page for (you can only see upcoming releases as far ahead as they have them announced).
To start building the API, install the WrapAPI Chrome extension, which adds a tab to dev tools. Load the page, open dev tools, and click over to the WrapAPI tab. Log into WrapAPI, click Start capturing requests, and reload the page to see this screen:
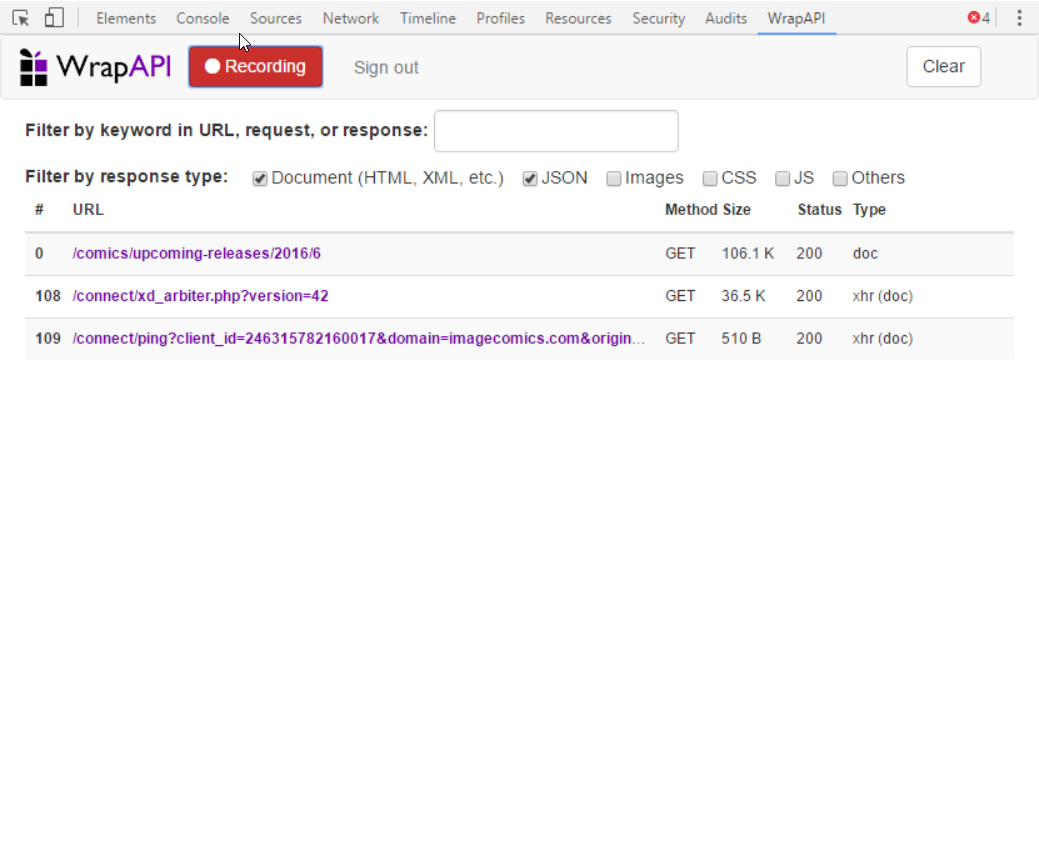
The selection we want is the plain HTML data, so click the URL and then click Save to API endpoint.
Now, log into your account on WrapAPI, and the next step is to define those inputs in the URL for year and month under the Inputs and request tab as shown below:
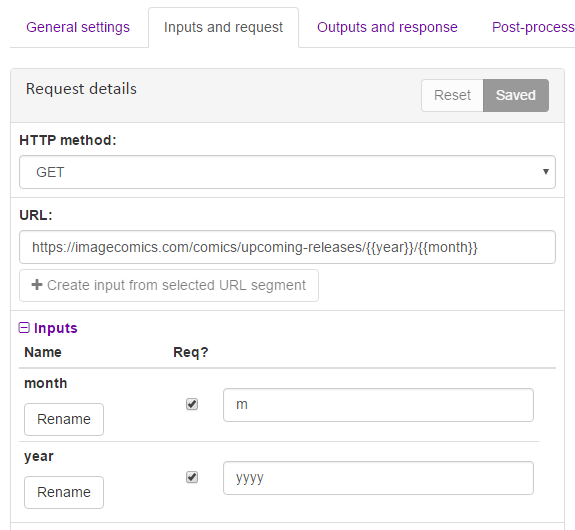
By defining these inputs, you’re building an API that can check upcoming releases for any month in any year. Not half bad! The next step is to test those inputs, so click over to the Outputs and response tab to add a test case. Let’s see if we can pull up releases for June, 2016 using the following test inputs:

This should return a 200 response and show a preview of the full page. Save this test case and return to the main page. Now the fun begins! This is the info for each comic we want to capture from the page:
- Title
- URL for that comic’s page
- Image URL
- Release date
- Writer
- Artist
- Cover artist
WrapAPI offers a few different ways to extract data from a page, but we’re going to use CSS classes for this project. Still on the same tab, click Add a new output scenario, then Add output to extract data and choose CSS selector.
If you’ve used the dev tools inspector, WrapAPI’s selector tool will be familiar. We’ll start by identifying where the comic titles appear. Click a title in the preview window and you should see something like this:
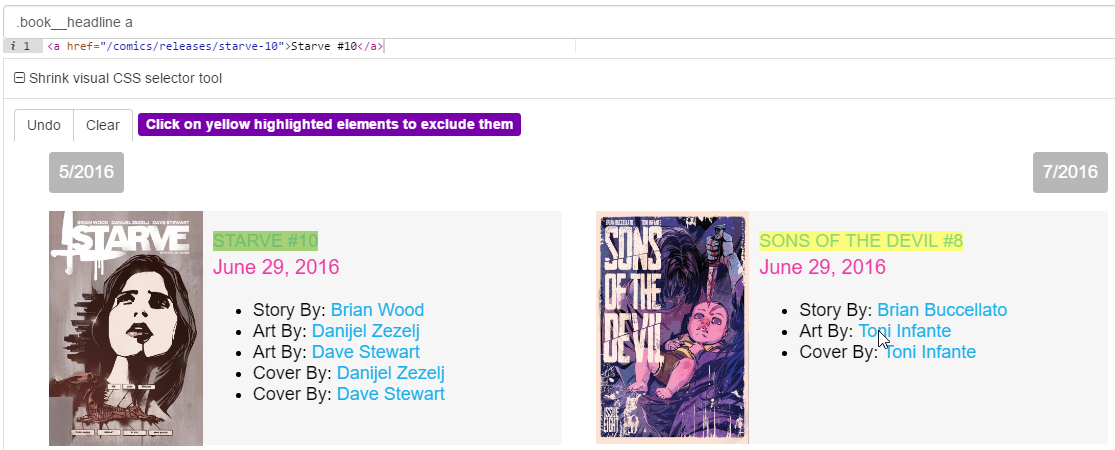
The element you originally clicked is highlighted in green, and all similar elements are highlighted in yellow. If elements are highlighted that don’t match, click them to refine the selection. In the image above, you can see the comic title is displayed as the anchor text of a link inside a paragraph with the class book__headline.
You can use a few other options to further refine your selection:
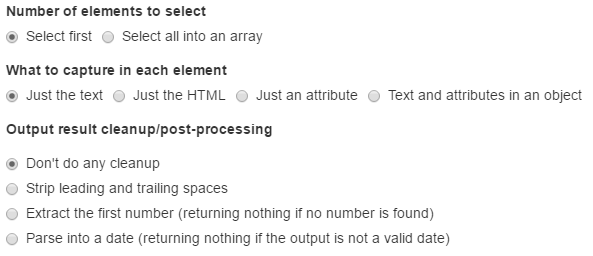
For this project, make sure to check Select all into an array, so you get data for all the comics on the page. You also choose to grab the plain text or attributes from an element. For example, for the URL of the comic’s page you’ll want to select the href attribute from the title’s link.
Once you’ve identified all the data you want, you’re ready to publish! Head over to the View and use API element tab and click Publish. Generate an API key to use and you’ll be ready to build the app.
We’re using a pretty basic structure. All we need in the HTML is:
- A datepicker
- An empty div to display the comics
You can check the repo to see how I put it together. The HTML is straightforward, but the JS is where it gets complicated.
We’ll start off the index.js file by just declaring a few variables:
1
2
const main = 'https://wrapapi.com/use/sethxd/image/upcoming/0.1.0?wrapAPIKey=YOUR_API_KEY';
let month, year, date, html = "";
main is the URL for your API + key, and you’ll see how the others are used in a minute.
I used pickadate.js for the datepicker, but most other options should work fine.
1
2
3
4
5
6
7
$(function(){
  $("#datepicker").pickadate({
    disable: [
      1, 2, 3, 5, 6, 7
    ],
    format: 'mm/dd/yyyy'
});
Since comics release on Wednesday, we can use pickadate’s options to block the user from choosing any other day of the week. You also format the output to match the dates listed on Image’s site.
We want to load comics whenever someone picks a date, so we use jquery to run our function when the datepicker’s value changes:
1
2
3
4
5
6
7
8
9
10
11
$("#datepicker").on("change",function(){
html = "";
$(".upcoming-comics").html("<i class='fa fa-spinner fa-spin'></i> Loading...");
date = $(this).val();
if (date.charAt(0) === "0") {
month = date.charAt(1);
} else {
month = date.slice(0,1);
};
year = date.slice(6,10);
let url = main + "&year=" + year + "&month=" + month;
This first part of the function just displays a loading spinner and formats the date so we can add our two inputs (month and year) to the API call.
Next, the API call itself!
1
2
3
$.getJSON(url, function(json) {
  let books = json.data.book;
  books = books.sort(alpha);
First, we’re just narrowing the API call results and sorting them alphabetically using this function:
1
2
3
4
5
6
7
8
function alpha(a,b) {
  if (a.title < b.title)
    return -1;
  else if (a.title > b.title)
    return 1;
  else
    return 0;
}
Now we’re going to use another library called moment.js to manipulate dates. Remember, the API call is pulling the comics released for the whole month, but we only want to display those for a selected week. I know there are edge cases where comics release on Tuesday or Thursday, so we want to account for those too.
Using the JS map function, we’re going to run over every comic in the array and check its release date. If it matches the selected date +/- 1, we want to display it:
1
2
3
books.map(function(x) {
  let formatDate = moment(x.date).format("MM/DD/YYYY");
  if (formatDate == date || moment(formatDate).add('days', 1) === date || moment(formatDate).subtract('days', 1) === date) {
We’re going to use a flexbox layout to display our results, so now for each comic that meets those date requirements we just need to add a div with all the data, and the class flex-item, to our html, like so:
1
html += '<div style="background: url(' + x.img + ')" class="flex-item"><div class="caption"><p><span class="title"><a target="blank" href="https://imagecomics.com' + x.url + '"><strong>' + x.title + '</strong></a></span><br>' + x.date + '<br>W: ' + x.writer + '<br>A: ' + x.artist + '<br>C: ' + x.cover + '</p></div></div>';
Before we display our results, we should account for the possibility that our API call fails, and the html variable ends up empty at the end of this:
1
2
3
4
5
if (html !== "") {
  $(".upcoming-comics").html(html);
} else {
  $(".upcoming-comics").html("Sorry, no results found.");
}
At this point, the bones of the app should be functional. We just need to dress it up with some CSS. This is what I did for the container and comics tiles:
1
2
3
4
5
6
7
8
9
10
11
12
13
14
15
16
17
18
19
20
21
22
23
24
25
26
27
28
29
30
31
32
33
34
35
36
37
38
39
40
41
42
43
44
45
46
47
48
49
50
51
52
53
54
55
56
57
58
59
60
61
.upcoming-comics {
  display: inline-flex;
  width:100%;
  padding-top:30px;
  flex-wrap: wrap;
  justify-content: center;
  padding-bottom:30px;
}

/* The container is just a straightforward flex container */

.flex-item {
  text-align:center;
  padding:0px;
  margin:10px;
  background-size: cover !important;
  background-repeat: no-repeat !important;
  width: 200px;
  height: 300px;
  position: relative;
}

/* We want a fixed size for tiles so the cover displays correctly */

.caption {
  position:absolute;
  font-size:0.9em;
  bottom:0;
  width:100%;
  opacity:0;
  height:100%;
		-webkit-transition:all 0.15s ease-in-out;
		-moz-transition:all 0.15s ease-in-out;
		-o-transition:all 0.15s ease-in-out;
		-ms-transition:all 0.15s ease-in-out;
		transition:all 0.15s ease-in-out;
}

/* The caption contains all the data, and is invisible until the user
hovers over the tile */

.caption p {
  height:50%;
  padding:10px 5px;
  position:absolute;
  bottom:0;
  width:100%;
  color:white;
  text-align:center;
  background: rgba(0, 0, 0, 0.8);
  margin:0;
}

.caption a {
  color: white;
}

.caption:hover {
  opacity:1;
  height:90%;
}
Now, one of the reasons I originally wanted to build this was to see not just which comics are releasing, but which trade paperbacks / collected editions are coming out. I noticed on Image’s site that most of these items have the characters “TP” or “HC” at the end of their titles.
We can add a few lines of code to our function (I placed it with the date checking) to snag the two characters at the end of a title:
1
2
let formatDate = moment(x.date).format("MM/DD/YYYY");
let lastTwo = x.title.charAt(x.title.length - 2) + x.title.charAt(x.title.length-2+1);
Then we add an if statement to the part of our code that generates the html. If that variable lastTwo is equal to “TP” or “HC”, we add the class collected to that flex item. If not, we add the class single.
After that, it’s simple to add a checkbox option to only show trades, and if it’s checked add a hidden class to all single issues:
1
2
3
4
5
6
7
$('.trades-check').on("change", function() {
  if ($('.trades-check').is(':checked')) {
    $('.single').addClass('hidden');
  } else {
    $('.single').removeClass('hidden');
  }
})
With that, you should have a working app that does exactly what it says on the tin!
The one thing I’ve been struggling with is getting the pickadate object to work on mobile. I’ve found a few different possible solutions online, but nothing seems to work. If you have an answer, drop me a line or comment below and let me know!